Monday, December 28, 2009

Yeah for a New Bath!

I must apologize for the delay in this posting.   Life has returned to a more hectic schedule with me working again. Therefore, it takes a bit longer to finish a project with my new 9 to 5 gig….

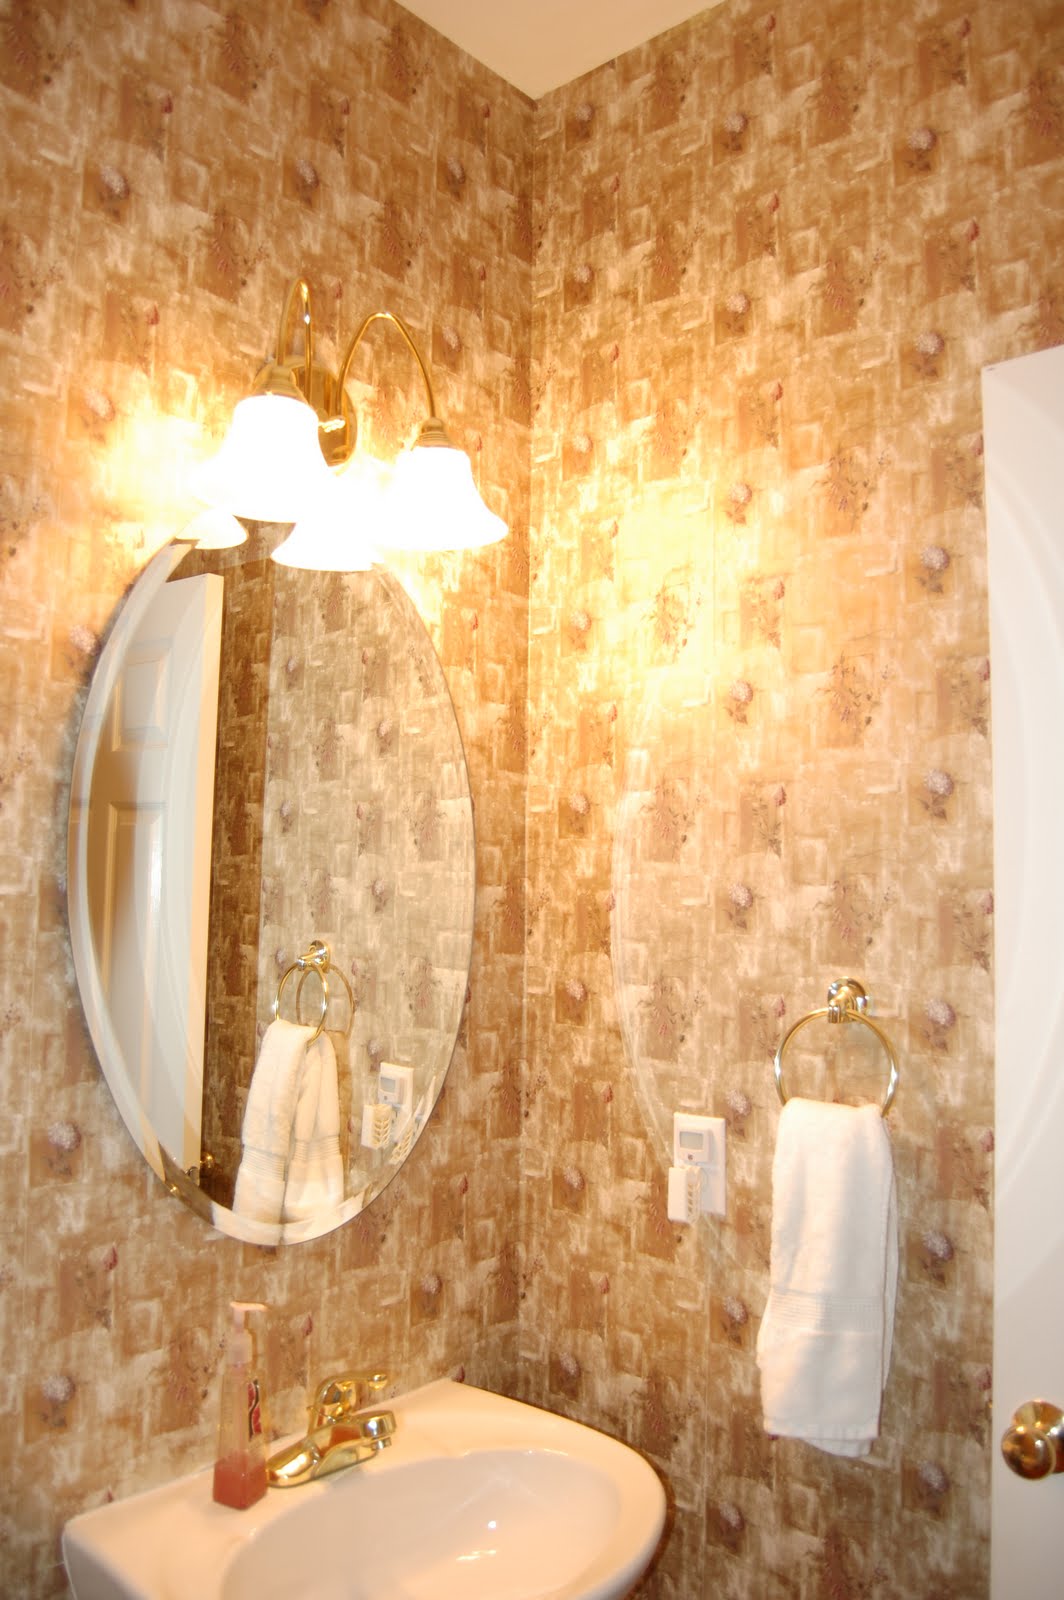
First, let's remind ourselves what he used to look like in his old wallpaper skin with gold brassy ornaments.


Without further adieu, I would like to introduce you to our NEW half bath on our main floor. He has endured quite a face-lift, and is so happy to be sporting a new look.........

A second...

A third....


So what is new?  Let's start with the foundation of what stayed...the toilet and pedestal sink.  The new items include: the mirror, faucet, toilet paper holder, Kohler quiet toilet seat, toilet handle, towel holder, light, the artwork, and cabinet.  I decided to go with a brushed nickel finish for all of the accessory pieces.  The paint color is Glass Slipper by Benjamin Moore.

You might be wondering what a "Kohler quiet toilet seat" might be..... It can be translated with one word "Heaven".... For all practical purposes, the seat is just like any other toilet seat you may have sat on in the past.  The big advantage to the "quiet toilet seat" is that when your Y chromosome friends put the seat down, the toilet seat slowly closes with no noise resulting in silence.  :) 

I spent quite a bit of time contemplating what mirror to purchase.  I really liked the Vintage Oval pivot mirror at Restoration Hardware (see below), but at $285, it was a bit of a splurge for a bathroom mirror.

Therefore, our bathroom went mirrorless for a few weeks until I could find a different option.  Luckily, a Christmas miracle occurred at Menards..... I spotted a very similiar, but totally affordable (on sale for $52) pivot mirror by Moen (see below).  The moment I spotted this wonderful mirror, I heard a church choir singing "Alleluia" in the store aisle.  I picked that mirror up as fast as I could (it was the last in the aisle), and sprinted to the check-out counter.

So there you have it, this is is how my bathroom lost it's brass.  Here is one more photo for your viewing pleasure.

One more thing, do you think I should hang a picture above the toilet/below the wall cabinet? Initially I was going to hang the cabinet a bit lower, but then I realized there was a chance my very tall husband might hit his head on the cabinet. I couldn't have that happen, so I decided to raise the cabinet resulting in room for another picture. Let me know if you think I should hang something, and any suggestions you may have.

Sunday, November 22, 2009

Bye-Bye Wallpaper

Since the first day I laid my eyes upon it, I have had a disgruntled relationship with the wallpaper in the powder room.  Quite simply, the wallpaper was just not my style.  In addition, the brass hardware was definitely not my style.  Therefore, I had toyed with the idea of removing the wallpaper for months, but never got around to tackling this project until now..... To fully appreciate the before, I have posted two photos below....

As you can see, the room is quite small, and the wallpaper did not do anything to open it up.

Removing the wallpaper was not as easy as I had hoped. Whoever applied the wallpaper did not do the prep-work necessary to protect the drywall. Therefore, the wallpaper came off in two layers--decorative, and then the papery gluey layer that held on extra tight to the drywall.


There are many ways to remove wallpaper. I initially started with spraying the walls with a hot water/fabric softener solution, but I found this to be very messy and extremely ineffective (it smelled really good though). I then moved on to working with a commercial clothes steamer. I highly recommend using steamer.... All you do is steam the paper/gluey layer until it is nice and moist, and then pull the paper layer off the wall. You can use a metal scrapper too while working with the steamer, but you need to be super careful you do not gouge the walls. As you can see below, I worked my way from the bottom of the way up removing the glue/paper area.

We also had to remove the toilet during this step because we could not remove all the paper behind the toilet.


Once the entire paper/glue layer was removed, my husband and I scrubbed the walls with a TSP mixture. Make sure you buy lots of disposable sponges. We went through about six two-packs scrubbing the excess glue layer off the wall. It took us about five hours total to do this very small room, but we wanted to ensure we had as much of the glue removed as possible.


Next, we had a professional drywaller come out to patch up all the gouges in the wall. There was a particular focus on fixing the corners where major parts of the drywall came off with the wallpaper. We could have probably fixed these ourselves, but our walls were majorly damaged, and we wanted to leave it up to a professional since we did not have the experience with patching walls with these many problems.

Once the walls were repaired and sanded to match the existing drywall, we primed/sealed the walls with Zinsser Bulls Eye 1-2-3 Primer. Because we were not able to remove all of the glue 100%, we needed to use a primer that would seal the rest of the glue into the drywall so it would not be visible once the new paint was on the walls. The Lowe's paint department highly recommended this brand, and so we went with it.

The Zinsser primer worked like a charm, and dried super fast (in 45 minutes), but BOY was it SMELLY. I mean TOXIC and SMELLY. It set all of our carbon monoxide alarms off in our home. Therefore, make sure you wear a mask if you use this product (which I did), and also make sure you have the area you are applying it to SUPER ventilated (many fans pushing the bad air out, and fresh air in).


From here, I needed to pick my new paint color. I decided to choose Glass Slipper by Benjamin Moore. I wanted a gray/bluish hue that would be spa like, and pop against the white molding. I also thought this color would look great with the new brushed nickel light, faucet, and other bathroom hardware (not pictured). To ensure I liked the color, I got a test hue, and applied it to the wall (sneak peek below). You can kind a see it below, but it is quite a bit lighter than what it will look like once two coats are applied to the walls. Also the lighting is off a bit since the actual bathroom light will not be installed until the painting is complete.


Therefore, the bathroom waits until Tuesday for the painter's arrival.... You may be asking why I am not painting it myself, but the short answer is it is against doctor's orders..... By no means am I revealing that I am with child, but rather I have a nerve disorder in my forearm that is limiting future projects for several weeks as I complete physical therapy. Thus, I can't paint or do a lot of the other fun things I have been doing for the last few months.....

At any rate, look for a big reveal in the next week of our new powder room!

Monday, October 26, 2009

Be Gone Shiny Brass Fireplace

Since the day we moved in, I have loathed our fireplace doors, and in part the brick surrounding the fireplace. I am just not a shiny brass kinda girl. I have delayed starting this project because I wasn't really sure where to start, but after a bit of research, and a lot of confidence I said good bye to my brass forever.

First, I took the doors off by unscrewing the clips that suspend the doors in them. This is a bit of a process, and you could really benefit from having four hands to complete. However, I did this on my own, and was able to balance the doors before they came crashing down. Next, I needed to remove the lovely part brass/part light wood handles. I bit off more than I could chew when it came to this step because one of the screws was already stripped. Since I like a challenge, I kept trying to remove the screw and therefore, further stripped it. I had enough where with all to recognize I had a problem on my hands. Therefore, I called the local hardware store, and lucky for me, they agreed to help we remove the screw (for free to boot). Perhaps I could have figured out how to do this (willing it to come off did not work), but we have limited tools so reaching out for help really got this process is moving.

After the hardware was out of the way, I got my sand on. I have an electric powered one, and used this to sand most of the brass off the doors. With this process, you are just trying to rough up the metal enough so that it will accept the new spray paint. Once this was complete, I taped and wrapped up the glass doors to protect them from my high heat resistant black spray paint. You may notice in this pic that there are two holes in the metal part of the door. This occurred when I realized the prior hardware was a crazy one of a kind size. Therefore, I had to drill two new holes so that my new black hardware would fit. It sounds way harder than it was. Trust me!

So once my doors were all wrapped up, it was time to get their spray on in the garage. It took about four to five light coats to coat each side of the doors. Patience is the key here because you want to ensure you are allowing the paint to dry in between the coats. I spray painted the inside part of the door first, and then moved to the outer doors.

Once the spray paint part was complete, I then installed my new black hardware. Reinstalling the doors was a bit of a headache because the doors are suspended on these little bracket things, and it was much harder to get everything real aligned than it was to take it apart. I would highly recommend that you have another person assist with reinstalling it, but since I am impatient, and did not want to wait for my husband to come home, I was able to get it all put back together just fine. I few choice words were used, but the end result is priceless.

Ta da......


I am just loving the fireplace's new look. The brick is starting to grow on me. Initially I was thinking of painting it once I had the doors complete, but now I think I am going to hold off on that until I am 100% sure I want to paint it.


So there you have it..... Brass be gone!  I am so happy that I finally tackled this project.  I just love looking over at my fireplace now.

Wednesday, October 7, 2009

Rose of Privacy or Rose of Sharon????

Many of you know out there that my husband and I were very surprised with all the landscaping we inherited from the previous owners. Let's just say that the snow did a number on hiding all the fun flowers of all kinds, cactus, and bushes placed randomly throughout the yard (literally). To say we were overwhelmed would be an understand statement. As mentioned in a few of my other posts, we have spent the first 18 months of home ownership digging our way out of the craziness known as our yard. We are FINALLY beginning to see the light to the tunnel of a more low maintenance yard. THANK GOODNESS!

Our major goal during our yard overall is to create spaces that are low maintenance, but lend us plenty of privacy from our neighbors. Our other major goal is to create obstacles so that children on bikes do NOT ride through our yard on their quest to get to the neighborhood pool. You see, the neighborhood pool is caddy corner from our backyard across the street.... Does that make sense? Basically, our backyard butts up to a berm, and on the other side of the berm is a road, and on the other side of that road lies the pool. We have created major obstacles in most places of our yard by planting trees, but there still lies an area where kids ride through near our driveway. Initially, we placed rocks haphazardly, but that did not seem to stop our bike riding friends.


From the pic, it is hard to see the rocks, but if you look really hard, you can see that between the tree on the left, and the bushes on the right, we placed about 8 or 9 rocks.  Very ineffective...... So I stepped up my game, and Lowe's was my partner in crime.  I was checking out the Garden section this week to find that all their bushes were on clearance at 25%.  So I start thinking that perhaps this is the motivation I needed to get my new obstacles in place.  However, the question arises as to which bush to pick.  I decided to go with the Rose of Sharon because there were 5 available in all the same color, they grow super quick, and we have a few of them in other places on the property.  So my decision was made easily, and boy was I happy to find that at the check-out they were actually 50% off..... Yippee!  Below, you can see that I evenly spaced them apart at around 3.5 feet (per instructions on the plants). 

Then, I got my digging on.... Luckily it had just rained, and the soil was very soft making this task so much easier.

Easy peasy!..... Now, I just can't wait until they take off, and fill in.  This bush is super lovely when it is in bloom (see the little bloom below).  I highly recommend it.

Below I have included some Rose of Sharon bushes we currently have planted on the property (they are over 6 feet tall).  As you can see, they have filled in very well, and create quite a bit of privacy. 

If only I could snap my fingers to get the ones I just planted to grow as big as their brothers.  Although, I think my Rose of Sharon is beginning to create the rose of privacy I quest....

Monday, October 5, 2009

Fallin' into Fall

I have been green with envy of many of the beautiful fall wreaths I have been spying around my neighborhood in the last week. Initially I thought I would just buy one (easy enough, right?), but then I couldn't find any that I liked in my price range. This lead to me think... HMMM..... Could I make one myself? So off to Hobby Lobby I went to purchase my supplies. I already had a Styrofoam hoop thing (just needed to spray paint it black). Therefore, I purchased a fall sway with leaves & berries, 3 pumpkins on wire sticks, and then 4 extra berries & leaves on a stick (see below).


Once I got home, I got my hot glue gun out, and went to town. Basically, all I did was glue down the sway around the hoop. Once I got this complete, there were a few bare places so I used my extra berry/leaves on a stick, and pushed those items into the foam securing in the back by bending the wire. Then, I spaced my pumpkins on a stick around the wreath.... That easy....

Drumroll Please......


And there you have it.... Above is a close up view of my very first wreath.... Yeah me! Below you can see a further away view of what it looks like for guests when they are approaching our front door.


So what do you think? Do you have any experiences with wreaths?

Monday, September 21, 2009

Front Yard Renovation: Part II: Plants in the Ground Ready to Grow

I am super pleased with how the front yard turned out. All and all, it was pretty painless having the seven tons of topsoil added in addition to having our front step, and two sidewalk tiles mudjacked back to their rightful spots (due to the settlement issue, our front step had settled about 3 inches below where it should have been). There were a few kinks in the process ie the electrical cord that leads out to our carriage light in the front yard was cut several times which required it to be patched several times which turned into having to replace and  trench a whole new line out to the light. Therefore, this requires a new project of seeding the four inch wide by several feet line of mud trailing through our yard, but all and all it could be worse.

Below is the view from the right side of our property line in front. The oranmental grass did a great job of growing in around the utility boxes.


Here is a closer look at the porch area.  Behind the Japanese Red Maple you will find 'P.J.M'. hybrid rhododendrons which will offer great flowers in the spring.  In front of the Japanese Red Maple we have two types of hydrangeas: mophead and limelight.

The below is a pic of the right side of the house.  Here we have boxwoods, limelight hydrangea, spireas, and several annuals planted.  We also had the landscapers put a flagstone path in to lead to the hose area which allows for easier watering.

Below you can see what the front entry looks like now.  We had a large surplus of decorate rocks all over our property from the previous owners.  We decided to incorporate them into the new design.

This view highlights the area in front of the garage windows.  Again we used some of the extra decorative rocks, boxwoods, crab apple tree (pre-existing), and some annuals. 

Below you can see how the flowerbed near the carriage light has been downsized, and filled with a bluestar mini-bush, a 'P.J.M.. hybrid rhododendron (pre-existing from prior owners), mini-irises (pre-existing), a red ground covering, and rocks. 


Below is the view of the utility boxes by the driveway.  Gone are the dying Junipers, and here to stay are the Yews.  It will take a few years for them to grow in, but it looks so much better already.

View from the driveway. Although it will take a few years for the bushes to grow in, I think the below looks so much better than what we started with in the beginning. All the new plants were a bit high maintenance this year because they needed to be watered almost daily to ensure they become rooted well (we had very little rain all summer and lots of heat once the plants were in the ground).

I love how it all came together. The only thing left to do is to seed the area where the new carriage electric line was installed in the yard. However, before that occurs, we will be aerating first since we have clay soil. Perhaps next year I will have flower boxes installed under the two garage windows on the left.  I think that would be the icing on the cake.

Front Yard Renovation: Part I- Cleaning up and Planning

One thing we did not expect to find the day we closed on our house was an insane amount of overgrown landscaping.  We placed our offer in March when the ground was covered with snow, and therefore, we had no idea what we were getting ourselves into when it came to our yard.  Some homeowners would be pleased to find lots of flowerbeds, but not my husband and I.  We were utterly overwhelmed with what we had going on around the house.  Our first summer in the house we decided to "try" to maintain what we had inherited.  We realized during this trial period that there was just too much going on for us to handle.  Therefore, we decided to downsize a few of the flowerbeds, and turn them into grassy areas.  We also filled in our small pond because it was just too much of a hassle to maintain in our minds (we also saw that down the road it would be a major danger area for children).  At any rate, I did not catalog our first summer nor the changes we made.  However, I have documented most of our  outdoor changes this past summer. 

First up, is the front yard renovations.  Essentially, we started off with lots of overgrown bushes, tress, and ivy.  Our other major issue was that we had some settlement issues, and therefore, we needed to bring in several tons of dirt to bring the grade up around the front of the house.  Therefore, we decided to remove most of the preexisting landscape, and start fresh once the grade was raised around the house.  The following pictures gives you a good look of what we started with in June.  Mind you, on the left side of the house, we had bushes under the windows where it is bare.  We removed those ourselves.  In the right hand corner of this pic you can see the  bed around the utility boxes that we cleaned up ourselves too.  The prior owners had planted a hodge podge of flowers around the box that didn't serve much purpose.  We decided to remove these flowers, and plant ornamental grass which would in turn grow high to cover the boxes.


We also decided to remove the Silver Maple tree from the front due to the extra work the pinwheels they dropped in the spring created, and then all of the leaves it dropped in the fall.  The tree did not serve much purpose, and we thought it would be nice to have more grass in the front yard.  We are more of the evergreen type of people (mind you we had 10 blue spruces planted in the spring so we more than made up for cutting this tree down).


The below view is from the driveway angle.  As you can on the bottom apart of the picture, the flower bed around the lamp post is overgrown with an overwhelming amount of Black Eyed Susans, and just begging to be downsized.


Below you can see the other utility box area that is on our property line with our other neighbor.  The browning Juniper was begging to be replaced with something else.  It just continued to look more and more sickly everyday.


The below pic gives you a better idea of all of the chaos we had going on in the flower beds. We decided to have the weeping cherry tree removed too because the placement would not work with our new design. We strived for clean lines and low maintenance.


As you can see above and below, these pics reflect all the plants removed from the flower beds in the front.  It was such a relief to have these cleaned up.


This picture gives you more appreciation for what a little hard work and lots of digging can do to the appearance of the house.


Now that we had all the beds all cleaned up, and ready to go, now what? Well, after lots of debate, and research, I went over to the nursery to help pick out some of the plants that I wanted to be part of my new design. I just love hydrangeas (I know they are a bit high maintenance, but they are so worth the extra work in my book), and boxwoods so these were absolute must haves. From here, I was  ope to suggestions. Therefore, our landscape architect went to work on his drawing...

.. To Be Continued....

Saturday, August 8, 2009

The Guest Suite Part Uno:Furniture Facelift

So I have been jonesing to revamp our guest bedroom since we moved into our house. However, the wedding planning took precedent before any major house projects could begin. Then, once the wedding was complete, I started to begin projects on our first floor. At any rate, the last week has been dedicated to overhauling the guest bedroom. First on my to do list was to turn our drab dresser and bookcase into something fab. I knew it could be done since we were working with a good foundation.


Here are the before pics......

The drawers that slide into the bookcase are sitting on top of the bookcase in case you are wondering where the random drawers belong that are floating on top....


As I said above, not to shabby.... Now, all I had to do was get my sand on.... Let me tell you, this step took a little longer than I had originally thought, but it was well worth it. Here is the dresser all sanded down.....

Next came the tinted primer. Because I was painting both pieces black, it was important to use a tinted gray primer. This step ensured an even tone of the final color once applied (I applied three coats of primer). By the way, the pics make the primer look sort of purple, but trust me it was really gray.


Just begging for their final coats....


Next, I applied three coats of the final color to ensure even coverage......... And for the big reveal.....


I am so lovin' it! These pieces could not have turned out any better.... It just shows you what a little paint and lots of elbow grease can do.....

Now I just need to get that chair on the right refinished.....There is always something that needs to go done, right?

Finally Breaking Down

Hi all! I finally decided to breakdown and create my own blog today. I really enjoyed viewing other talented individual's blogs in the past few months, and I decided that I wanted to get in on the action of sharing all my amazing tranformations in my own lovely space. Therefore, this is the beginning of me sharing all the fun projects I have completed in and around my home in the past few months. I am not really sure where exactly I will be going with all of this, but lets take this for a whirl.