Sunday, August 29, 2010

Master Bath Reno: Part 7-Paint Selection

The master bath is really coming together this week.  Great advancements were made with selecting our new paint color, and painting the room.  I chose to move forward with Benjamin Moore's Wedgewood Gray HC-146.  I wanted a moody blue gray with a bit of depth to it so that the room would not be washed out by all the white cabinets, white doors, white molding, white cermanic tile, and then now the newly installed creamy/tannish  marble flooring.  I went with an eggshell finish in the Eco-Spec line as this is their no VOC paint.  The ceiling is painted Benjamin Moore Decorator's White in eggshell (Eco-Spec), and the molding is Benjamin Moore Decorator's White in semi-gloss (Regal line).
Before we could get the paint on the wall, the walls needed quite a bit of work.  The previous owners had painted this room themselves, and let's just say they did not give the TLC it needed.  Dried paint drips were plentiful as well as brush marks.  Therefore, we spent lots of time sanding and prepping the walls.  There were also the huge holes in the walls where the old brass Hollywood lights were located.  So after about four hours of prepping the walls, we were able to paint. 
Before
After

I hope the above photos curb your enthusiasm for the final reveal coming in the next week.  I am just so excited to finally be able to use this bathroom again.  It has been about two weeks of showering in the basement bathroom which isn't all bad, but that extra flight a stairs when you are pregnant can be a bit annoying at times.

Paint Colors: Wall- Benjamin Moore- Wedgewood Gray eggshell finish-Eco Spec; Ceiling- Benjamin Moore- Decorator's White eggshell finish- Eco Spec; Molding- Benjamin Moore- Decorator's White semi-gloss- Regal line.

Saturday, August 28, 2010

Master Bath Reno- Part 6- Light Selection

Good bye Hollywood...... Hello engery star lighting!  I am so excited to say sahari to the old brass Hollywood lights that just about everyone has in at least one of their bathrooms.  Hollywood served it's purpose, but everything has a shelf life, and it's life has come to a close.                                                              Before
Close-up
Choosing a replacement lighting option was a bit more challenging than I thought it was going to be.  I searched all the local hardware stores, and your usual suspects online.  I wanted to choose something that had an Energy Star rating with straight lines that was well priced.  Luckily, after about my third week of shopping, I stumbled upon the below option at Lowe's.  It is one of their new options on the floor, and I was excited to find two available for purchase.
Installing the lights were relatively easy once we were able to center the lights on the wall.  The challenge part came in when we needed to repair the giant holes in the walls left by where Hollywood had left it's mark.  Lots of spackling and sanding involved, but it was well worth it.
The bathroom project is coming together quickly.... Look for an update on paint this weekend. :)

Sunday, August 22, 2010

Master Bath Reno- Part 5- Marble Flooring

We made great progress with our master bath this week.  The awful carpet is a thing of the past, and the gross tile in the toilet room is out.  Yeah!  Below is the how we got the job complete.....
Before
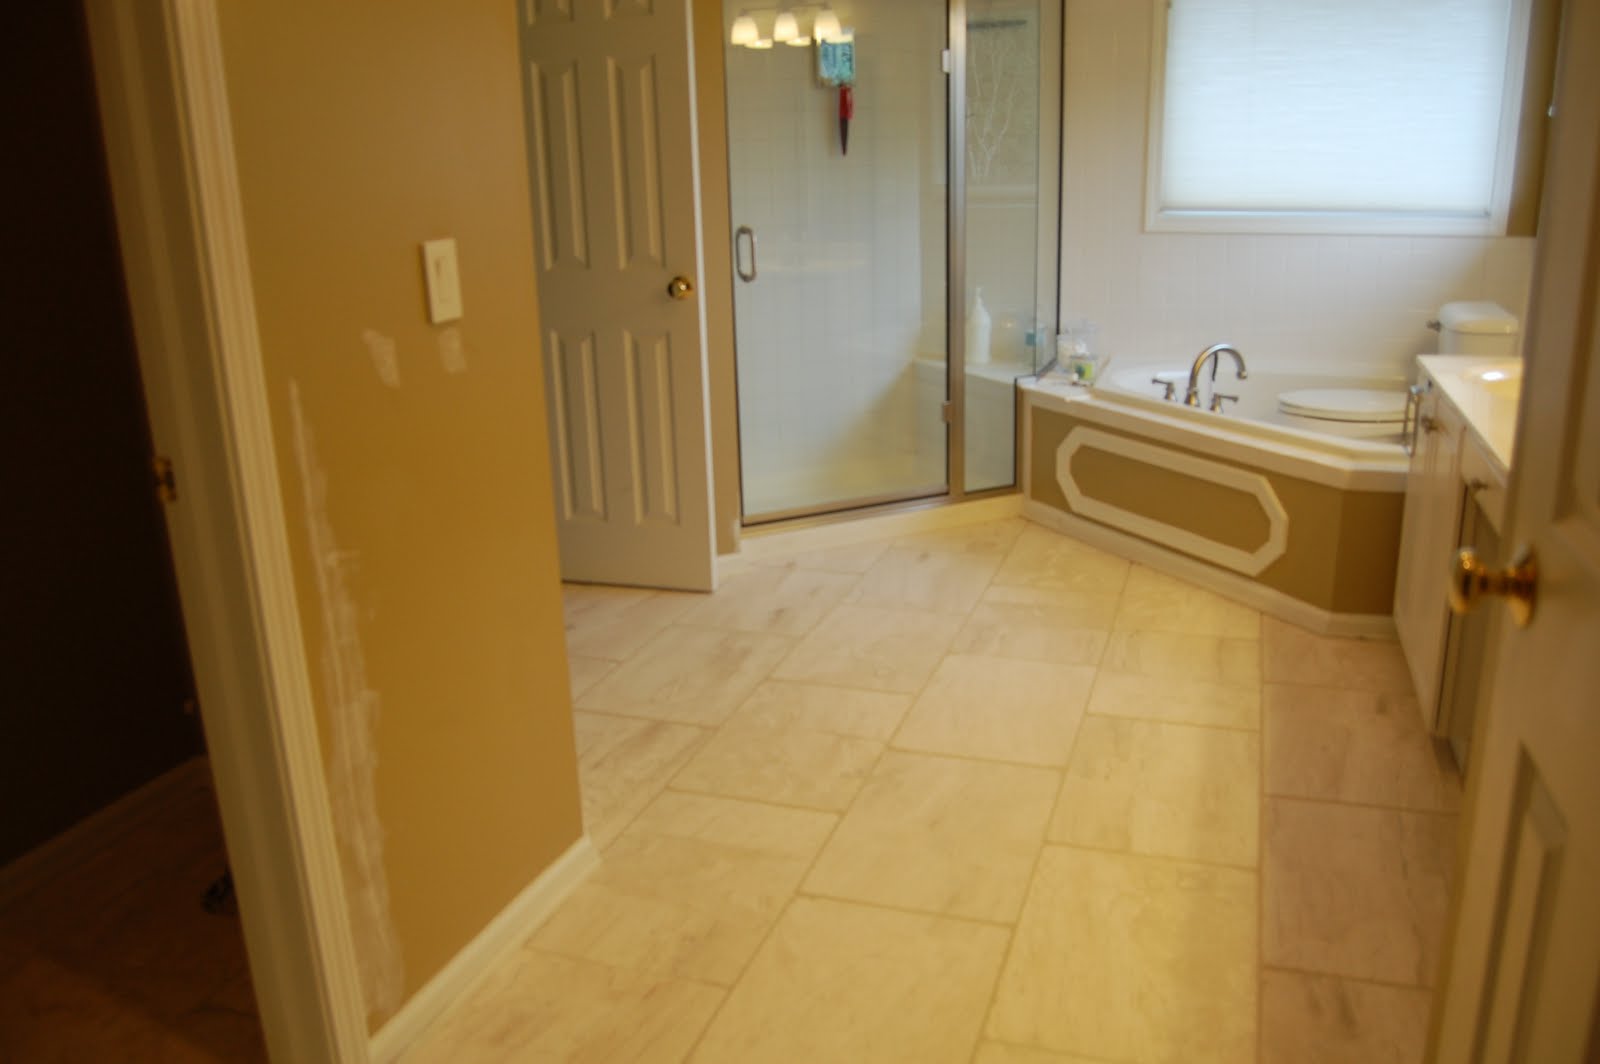
After (with Durock down)
We selected Turkish marble in a 16 in x 24 in size for our master bathroom.  In the spirit of working with some of the existing items in the bath, we needed to go with a pattern/color combo that was neutral that would work with our off-white fiber glass shower bottom, but would also work with our more white with gray specks countertops.  Of course, there was all the white tile to consider that surrounded the shower and bath tub.   Our bath is about 135 square feet, but there are a lot of crazy angles in the bathroom.  There were very few tiles that did not need to be cut to size. 

The Turkish marble color scheme is a milky cream color with grays and tans swirled throughout.  It is not polished which makes for great traction which is very important in a room where it is inevitable that water will be splashed on the floor from time to time.

We did hire our for the installation for this project since the bath is anything, but a standard size.  Below you will see a picture of the marble in, but not grouted.  It took our contractor one day to get the marble laid.  We choose to have the marble laid in a brick pattern. 
Here is another angle without the grout.
Our particular marble tile needed to be sealed before the floor was grouted.  The contractor used Aqua Mix Sealers Choice Gold.  This product claims to be low VOC, but it left quite an odor behind once applied for a low VOC product.  After airing the space out for a few hours, the flumes were gone, but we were quite disappointed with the stench it left behind for those few first hours.
View from the Master Bedroom with birch grout
Another view from the Master Bedroom (grouted)
Closer look at the Marble Brick Pattern
Angle from our Master Closet
So there you have it, after 2 plus years, the nasty carpet is gone, and we could not be happier with our marble selection.  Next on tap is paint..... Stay tuned!

I am linking up to the following parties.....

Saturday, August 21, 2010

Master Bath Inspiration

I thought it was about time that I share with you my inspiration for our master bath. As you know, this has been a project long in the making. Since the day we moved into our house, our master bath needed some work. However, I was indimated by all that needed to be done so I focused on some of the "easier" transformations on the first floor. Well, the time has come, and the master bath is getting addressed.
So far I have shared with you our new shower door transformation, and the hardware choices we have made. Although the picture below has polished chrome, I went with brushed nickel. What I love about this inspiration photos is that it feels so spa-like, and relaxing to me. Just what you want for a master bath.... A little piece of heaven to relax in.
Future posts I will share with you the hardware installation, tile installation, lighting installation, paint, and finally the accessories.  I am really liking the art that Pottery Barn has showcased here.  I am thinking of trying a little "diy" project to see if I can get this look.

Sunday, August 15, 2010

Nursery Update- Paint

We made one giant step in our progress in the nuresry.  It is now painted.  I had difficultities selecting the right color of yellow which delayed the process for a about two weeks.  I finally decided upon Hawthrone Yellow by Benjamin Moore.  I had entertained using Lotus Yellow too, but it seemed a bit too bright, and I also considered using Yellow Lilies, but at times this seems like it might be too pale.  Therefore, Hawthorne Yellow was just right.  We used Benjamin Moore's Eco-Spec paint as we did not want to pollute the air with any VOCs.  All the moldings in the room were painted Decorator's White in semi-gloss by Benjamin Moore, and the closet was painted Decorator's white, but in an eggshell finish.  I went with an eggshell finish with the Hawthrone Yellow too since this will be a child's room.  As for the ceiling, we went with 1/4 of the recipe for Glass Slipper by Benjamin Moore.
Before
After
The lighting is not great since it has been a bit cloudy, and we do not have traditional lighting in here right now.  Better pictures to come in future updates!
It maybe hard to see in the picture, but the ceiling has a small tint of blue to it.  I am considering adding crown molding for a higher impact.
I am hopeful the crib will be arriving in the next week or two.  I am considering adding some red stripes to the wall behind where the crib will be, but since we do not have the furniture placed in it's final resting place, it is hard to commit.  Also, I am not sure if the stripes would be too much. 

I am also wrestling with what type of window treatments to add.  I am considering installing Roman shades in red, but I am thinking long term it might be better to add 2 inch white faux wood blinds, and then pairing these with gigham curtains in red.  Any advice would be appreciated.

Tuesday, August 10, 2010

Nursery Inspiration

As many of you are aware, my husband and I are expecting our first little one at the end of Thanksgiving.  We decided to keep the gender a surprise until the big delivery day so we needed to go with gender neutral decor.  This was not a hard decision for me as I have had my eye on the Dr. Seuss nursery bedding from Pottery Barn for some time.  Pottery Barn has had me at hello with these pieces.  I just think everything is adorable.
Here is a close up of the bedding:

Here is the PB toddler inspired room........
So there you have it...... A Dr. Seuss nursery coming right up.  We did purchase some of the items that are displayed in the Pottery Barn photos, but I decided against the bumpers as there is still a lot of debate whether bumpers are safe or not for your little one due to SIDs.  I will write further posts about the items I picked, and why I picked them.... Until them, enjoy the above eye candy. :)

Sunday, August 1, 2010

Nursery- Part 1: The Cleanup

As I announced a few weeks ago on the blog, I am expecting a little one at the end of November (Thanksgiving to be exact).  Therefore, that means we need to designate a bedroom in our home for the little one.  We have three to choose from (in my mind two since I did not want to convert our newly finished guest room) in the home.  We chose the room closest to our bedroom as I thought this would lessen the steps needed for late night feedings.

Once the room was selected, we needed to get it organized/cleaned out.  This room had been the place everything that did not have a spot went to die.  It also functioned as my over flow space for my clothes.
It is a bit embarrassing sharing with you just how bad I let this room get, but because I know everyone likes to see pics of other people's messy homes, here are a few more....

Now you have a good idea exactly what we were working with to start this project.  We got started by finding new homes for everything that was in the room that was not going to stay in a nursery (which was pretty much everything).   We did a lot of pitching, and a run to goodwill to get rid of some items.  I also returned many items that were in holding for other people.  After a few hours, here is what the room looks like.....

This is the view from the door
View from the corner where the dresser is
Looking towards the door
Opposite corner
There are a few items that still need to find new homes, but overall, it is stripped of the clutter that once remained.  The black piece of furniture needs to be moved downstairs to the basement, but we need to wait until someone is able to assist with moving the piece since lifting furniture is a pregnancy no-no.  The dresser and white book shelf are staying.  I am undecided whether the mirror to the dresser will stay.  Decisions, decisions.....

Stay tuned for my inspiration post for the nursery...... Many, many more nursery related posts to come.... :)