Monday, October 25, 2010

Draping the Master Bedroom

Our master bedroom has been a work in progress.  What I mean by that, is that we really haven't spent much time or energy on this room.  Although I have spent a lot of time updating and decorating other rooms in our home, I have chosen to leave this room alone.  Part of the reason for this is due to the bonus room that is attached to this room.  Our master is more of a suite, and I just don't know what to do with the bonus room.  Which room should actually hold our bed?  Should I make the other room a sitting room?  Because the possibilities are endless, I just haven't had a lot of confidence to do any sort of painting or purchasing extra furniture until I am sure of what I want to do with the space.  I definitely want to purchase a headboard soon, but I am just not sure what I want..... So I have just sort of waited...

However, now that I am getting ready for baby number one, the one thing I needed to accomplish was creating more darkness during the day in this room and possibly have properties that eliminate noise.  Because I know that soon I will be trying to sleep whenever my little one is sleeping.  Therefore, I decided to hang black-out drapes.  Initially I had a hard time deciding what color to go with since I know that in the coming months, most likely I will start decorating this room.

Before #1
Before #2
Initially I had a hard time deciding what color to go with since I know that in the coming months, most likely I will start decorating this room.  I wanted to make an investment in something I could hopefully use in the room down the road.  Therefore, I went with an ivory/blushy blackout silk option from Bed Bath & Beyond.  It goes with our bedding as of today, and I think it will work with whatever we choose in the future.
 After

Overall, I am extremely happy with my additions.  I am most pleased that the room is extremely dark regardless of the time of the day.  I am hopeful this will help be get some extra sleep in the coming weeks.


Sunday, October 17, 2010

Alarmed.....

Most of you are most likely aware that October is National Fire Prevention Month.  Many of the home improvement stores have fire alarms on sale to help homeowners better protect themselves.  One thing I did not know, is that most fire alarms need to be replaced after 10 years.  This fact was important to me as our home was built in 1997, and with it being 2010, that meant that most likely most of our fire alarms in our home were overdue for replacement.  Also, I am in my third trimester of pregnancy, and my nesting instincts have really kicked in.  Therefore, my husband and I checked all our fire alarms, and found that most of them did indeed need to be replaced. 
Before
Once we determined we needed to replace our smoke alarms, we decided to do a bit of research as to what type of alarm to install.  We quickly learned there are two type of alarms: photoelectric and ionization.  So what is the difference you may ask?  Ionization sensors may respond slightly faster to flaming fires, whereas photoelectric sensors may respond slightly faster to smouldering fires.  Both meet federal and state safety guidelines, and the verdict is still out as to which one is better (from my research).  Therefore, it is recommended to enhance your fire safety prevent, that you install both type of alarms as you can not predict what sort of fire you may have.  We decided to go one step further, and choose some dual purpose fire alarms that also have carbon monoxide detectors.  Therefore, we installed six new fire alarms.  Four are battery powered, and two are hard wired to the house electrical system.  We added additional fire alarms to each of our bedrooms in the interior of the room as none of our bedrooms had fire alarms inside of the room.  It is recommended that you have alarms in your hallway, and then in the inside of the bedroom if you sleep with your doors closed (which we do). 
After (Hallway)
 After (Nursery)
All and all, the replacement units and install of new alarms took a little over a hour.  It was easy work, and I am very pleased to have this knocked off our list.  It is reassuring to know that all the alarms are functional, and will alert us if the need arises. 

Monday, October 11, 2010

Falling for Fall.....

The Midwest has been experiencing temperatures that are more inline with summer than fall.  In Indiana, we haven't had rain in weeks.  Most people's grass is burnt, and most plants have given up, and are just dormant.  However, the fall foilage is starting to fall, and it brings about my favorite time of year: fall.  To get into the fall spirit, I planted some mums in pots for our porch.  I thought I took some pics as I completed the process, but that wasn't the case.  Therefore, all I have to share are a before and after.
Before
After
 Close-up of Mums... Yummy Yellow color
 Just beautiful Peachy Flowers

 Beautiful Tree in front of our Home
Hopefully the temps will start to drop in the coming days.  Today's high was 87 degrees which set another record.  I am looking forward to some 50 degree weather.... Cross your fingers we will get it.

Sunday, September 12, 2010

Rose of Sharon Update.....

Since we are nearing the end of summer, I wanted to share a quick update on my Rose of Sharon bushes I planted last year.  You may remember them from this post Rose of Sharon Post.  I got them on major clearance at Lowe's and I planted them in the hopes of stopping teenagers from walking through our yard last October, and I must say it worked.
The bushes have really grown in this summer despite the drought Indiana has been suffering.
Close-Up
It's amazing how many blooms the bushes have had the last few weeks.  The bushes are looking a bit leggy, and I will trim them up in a few weeks once the blooms are done.  I am so happy they have grown in so well. 

Friday, September 10, 2010

Nursery Update: The Crib

The crib is in.  Well, sort of.... You see, the furniture store misordered the crib we ordered.  Somehow, this mistake was not caught until the crib arrived the other day.  Man, I was not happy.  I waited 14 weeks for this crib, and was very displeased that it is not right.  The crib they brought is beautiful, it just isn't "my" crib.  After some discussion with the store manager, the store manager decided that we could keep the wrong crib until "our" crib arrives.  The manager is expecting our crib to arrive by the end of September, but I am not holding my breath since we were suppose to get our first crib within 6 weeks.  Without further adio, here is the crib for now..... So here sits the Young America Built to Grow 2600 Panel/Spindle Crib.
Luckily, the dimesions of the above crib are exactly the same as "my" crib the Built to Grow 2000 Slat crib (see below- my version is the cotton finish).  Therefore, I will be able to set-up the room around this crib, and will be able to switch out "my" crib when it arrives in the coming weeks.  I am not freaking out as much about this mix up now that a few days have passed.  Baby N is not due until the end of November so we should have the right crib by then, and if we do not, Baby N will be sleeping in a bassinet for a few weeks anyway.
Therefore, I must day dream what "my" crib will look like for now.  I am hopeful it comes sooner or later, but at this point it is out of my hands.  More updates on the nursery to come... I am currently working on figuring out some artwork options for the space.

Wednesday, September 8, 2010

Outdoor Lighting Update.....

Let's face it.... Our outdoor lighting had seen better days.  After 13 years of 365 days out in the elements, the brass fixtures had begun to wear away.  In some places, the finish on the lights were blackened. 
Close-up Before
Side of Garage Before
Therefore, last weekend, the time came to update the jewelry on the house.  It took some time to find a replacement.  We wanted to find an option that would allow for the lightbulbs to be easily changed.  The old brass model were a bit difficult becasue there was a piece you had to unscrew two screws before you could access the lightbulbs.  Also, because I have a height disadvantage, I always need a chair or ladder to access. 
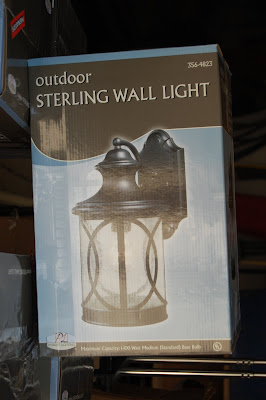
On a trip to Menard's, we found the above option.  The look was right on, and the lightbulb access was through the bottom of the light.  They were also a decent price at about $35 a piece (this was important since we needed four for the garage, and one for our front porch).  Luckily, we were able to find the five lights we needed: Score!

Once we got home, my husband got to installing them under the direction of our neighbor.  This was my husband's first go around with installing lights, and he completed like a champ.  After about 2.5 hours, all the lights were up.  They are now ready for their close-ups.....
Now, that is so much better.  Instant update.... It is so refreshing to pull into the garage now, and this wonderful bling hanging from the house.

Sunday, September 5, 2010

Master Bath Reno: Part 8- Towel Bar Progress....

Let's just say, I was hopeful to have more to update you on this week than towel bars, but let's just say I am starting to slow down now that I have entered my third trimester of pregnancy.  At any rate, I don't want to rush through finishing the space so it may take a little longer to accessorize than I thought..... As I weed through figuring out how to complete my space, let me remind you of the desperate towel bars we once had in our bath....

It is a bit embarassing to admit this, but these towel bars have been hanging out of the wall for at least nine months.  Because I knew I would be replacing them in the future with brushed nickel updates, I just couldn't bring myself to fix them.... Therefore, they just sort literally hung around..... Until now.... I spent about a hour replacing them, and let me just say I am so excited to have towel bars that are brushed nickel that do not hang out of the wall...I went with the Moen Glenshire towel bar line.  They were on sale for 20% off at Menards last week resulting in a bit of savings.  The template that comes with these towel bars is wonderful.  It makes installing the hardware a cinch....
Before
After
The towel ring took less than 10 minutes to put up... Easy Peasy, and boy is it conventient to have a place to hang your towel again.

Installing the towel bars by the shower took a bit more time.  I needed a place to hang three towels.  Of course I require two towels myself, and my husband needs a place for his.  Before, we used to have a towel bar on our glass shower door, but we went for a more seamless option without a bar.  Therefore, the Moen Glenshire double towel bar and single towel bar fit perfectly (well almost perfectly).  You see, the double towel bar comes in a 24 inch length, but my wall space would not allow for this which meant I needed to cut the bars down to size.  I went with the 18 inch length as the single towel bar was already this size, and the template that came with bars would be perfect for this (no customization needed).  Therefore, I marked my rods for 18 inches, got the hack saw out, and cut them to size.  I must admit, the cutting took a bit more time than I thought it would, but I think I got both rods cut in about 20 minutes or so.  Once I got the rods cut, then it was time to get the templates on the wall.
After drilling a few holes in the wall, I was able to get the hardware up.
I am just over the moon with the completion of this project.  Before the update, we only have one towel bar on this wall, and the other one was across the room.  It is so nice and convenient to have our towels an arm length away.  Makes showering that much easier...